Creating
Introduction
Download the iConfigure template Download Link . Download the iConfigure plugin Download Link .
Overview
Welcome to the This series is designed to guide you through the process of using iConfigure in combination with First 3D to build powerful and visually engaging product configurators. This introductory section provides an overview of the capabilities of iConfigure, focusing on its key features and functionalities, as well as a walkthrough of the back-office interface.
What is iConfigure?
Definition
iConfigure is a CPQ (Configure, Price, Quote) software designed to facilitate the creation of customizable 3D product configurators. It integrates seamlessly with First 3D to provide a user-friendly platform for both developers and businesses.
Key Features
3D Product Configurations
- Leverages First 3D for real-time 3D product customization.
- Provides an intuitive interface for end-users.
Dynamic Pricing Engine
- Calculates prices dynamically based on user inputs.
- Supports conditional logic for including or excluding options.
Quotation Generation
- Automatically generates PDF quotations that include a screenshot of the configured product and a detailed list of chosen values.
Analytics Module
- Tracks user interactions within the configurator.
- Offers actionable insights to optimize user experience and sales performance.
Dealer Module
- Enables dealers to embed customized configurators on their websites.
- Supports branding with dealer-specific styles and colors to align with their webshops.
Back-Office Overview
The back-office is the central hub for managing iConfigure’s functionalities. Below is an overview of the key sections:
Homepage
- Displays a summary of activities over the past seven days.
- Metrics include user interactions and configurator usage.
Metrics Section
- Tracks key data points such as user behavior and configuration trends.
- Provides insights to help optimize configurators.
Configurations Overview
- Categorizes products into owned, dealer, and supplier products.
- Focuses primarily on owned products during the initial setup.
Quotations Overview
- Lists all quotations generated by the system.
- Allows clients to manage their quotes efficiently.
Dealer Management
- Includes tools for adding and managing dealers.
- Features customization options for dealer-specific configurators.
Export and Data Management
- Allows exporting of data such as quotations, customer details, and tracking information.
Settings
- Configures company-specific settings, including branding and operational preferences.
Setup
Installing iConfigure Plugin
Download the iConfigure plugin from the GitHub repository.
Extract the downloaded ZIP file.
Copy the plugin to the following directory in your Verge 3D installation:
- puzzles/plugins
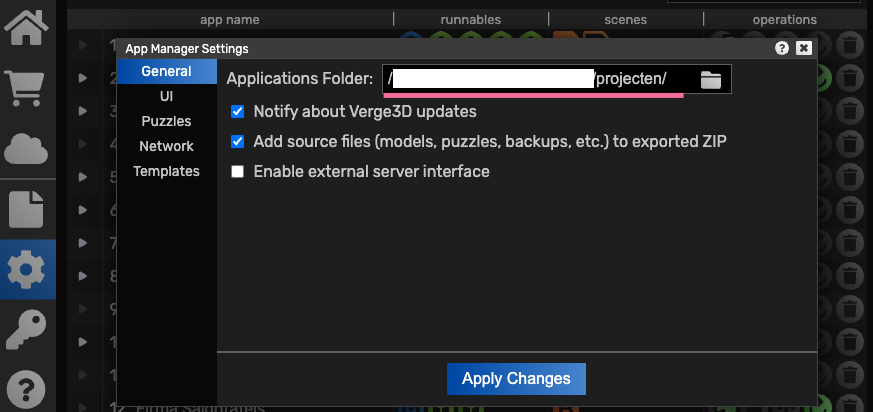
Place the template file in the appropriate applications directory.
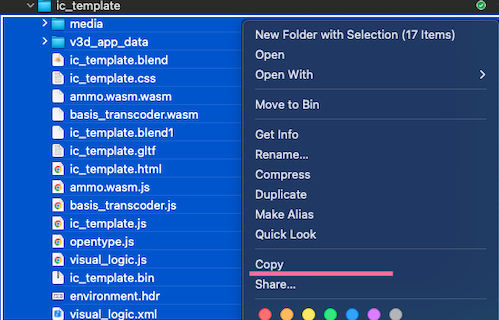
Use the Applications folder for Verge 3D or locate your custom directory.

Adding a New Product
Open iConfigure and navigate to the "Configurations" section.
Click "Add New Product."
Open Blender and click on "App Manager"
Copy the URL of the newly created configurator.

Paste the URL into the "Verge URL" field in iConfigure.
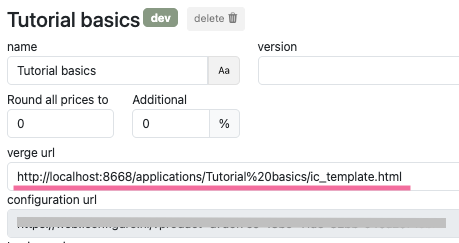
Save and preview the configurator.
Ensure Verge 3D is updated to the latest version for compatibility.
Export your Blender Project everytime you make a change.
Basics of iConfigure
Structure of a Configurator
A product configurator in iConfigure is organized into a hierarchy of components that ensure flexibility and ease of use:
Product
- Represents the overall configurator project, encompassing all steps, features, and subfeatures.
Steps
- Represent the primary stages of the configuration process.
- Example: In a table configurator, a step could represent the "Tabletop" category.
Features
- Contain the main customization options within each step.
- Example: Features under "Tabletop" might include material, color, or shape.
Subfeatures
- Nested options within features for finer customization.
- Example: Specific colors like "Red" or "Blue" under the "Color" feature.
These categorizations are designed to create a structured flow. Steps serve as the overarching categories (e.g., "Tabletop"), while features and subfeatures provide deeper levels of customization.
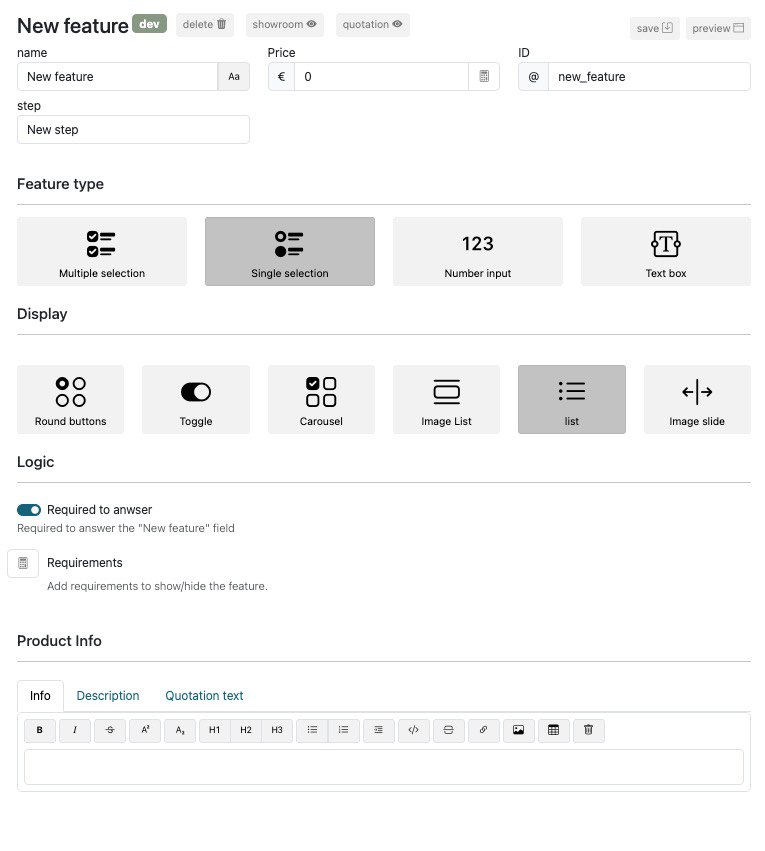
Types of Features
Single Selection
- Users can choose only one option from a set.
- Example: Selecting "Wood" as the material for a table.
- Feature ID Example: feature_material.
Multiple Selection
- Users can select multiple options simultaneously.
- Example: Choosing additional finishes like "Glossy" and "Anti-Scratch."
- Feature ID Example: feature_finish_glossy and feature_finish_anti_scratch.
Number Input
- Accepts numerical values with configurable units, steps, and ranges.
- Example: Entering the height of a table in centimeters.
- Feature ID Example: feature_height with a step value of 1.
Text Input
- Allows for custom text-based input.
- Example: Adding engraving text to a product.
Features can be displayed as buttons, toggles, carousels, image lists, lists, or image slides. The style and type of features depend on the project, input methods, and visualization requirements.
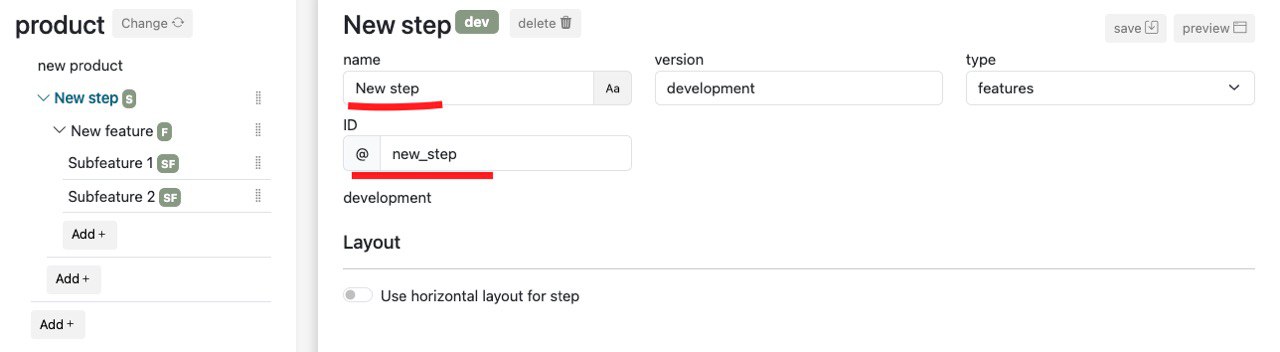
Adding Features
- Navigate to the iConfigure admin interface.
- Add a step (e.g., "Tabletop").
- Define a feature and assign it a unique ID (e.g., feature_material).
- Add subfeatures under features, customizing their IDs for clarity.
Configure properties like:
- Input type (e.g., single, multiple, or number input).
- Default values.
- Associated pricing or conditions.
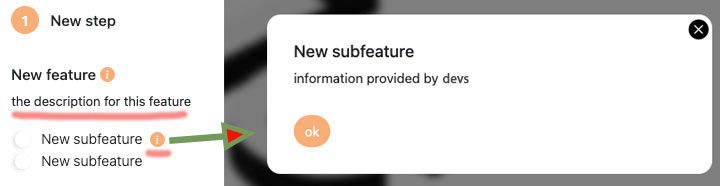
- Add information and description to features and subfeatures. This information is displayed dynamically on the final page for users.
Previewing the Configurator
- Save your configuration progress frequently.
Use the preview tool to test and validate the functionality:
- Check single and multiple selection options.
- Verify input fields like numerical or text inputs.
- Adjust features and subfeatures as required for optimal performance.
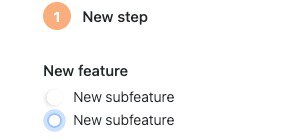
Visualization in the Front End
- Steps are displayed as distinct sections, each representing a stage in the configuration process.
- Features are displayed as input fields such as dropdowns, checkboxes, or buttons.
- Subfeatures appear nested within their parent features for seamless navigation.
Visualizations
Display Types for Features
iConfigure supports various display styles to enhance usability and appearance:
Round Buttons
- Circular buttons for simple selections.
Toggles
- Binary (on/off) switches for enabling or disabling features.
Carousels
- Horizontal scrollable displays for multiple options.
Image Lists
- Thumbnail-based lists for visual selection.
Image Slides
- Stretchable images for mobile-friendly horizontal scrolling.
Conditions
Overview
Feature conditions allow developers to include or exclude features and subfeatures based on certain criteria. These criteria can be set to be true or false and allow for highly customizable configurations.
Adding Conditions
- Navigate to the desired feature or subfeature.
- Add a "Requirement" condition.
- Set the condition logic (e.g., "If single selection equals 1, hide this feature").
Examples of Conditions
Simple Conditions: Show or hide a feature based on a single input.
- Example: If singleselection = 1, hide the feature.
Advanced Conditions: Combine multiple conditions using logical operators (AND, OR).
- Example: Show a feature only if singleselection = 1 AND numberinput > 75.
Features and subfeatures can also have logic for pricing and visibility under defined conditions.

Advanced Calculations in iConfigure
Overview
iConfigure’s calculation system allows developers to perform dynamic pricing and mathematical adjustments with ease, offering a blend of flexibility, precision, and scalability. It stands out by enabling real-time updates through dynamic variables, ensuring configurators remain adaptable to changes without requiring extensive manual intervention. This makes the system particularly valuable for developers seeking to create efficient, future-proof solutions for complex customization scenarios. By leveraging dynamic variables, static values, and conditional logic, you can create configurators that adapt to future changes without requiring constant recalculations or manual updates. This ensures that prices, dimensions, or other inputs remain scalable and maintainable.
Feature calculations enable dynamic pricing and other numerical adjustments within the configurator. These calculations can be applied conditionally or unconditionally, using inputs such as numerical values or quantities.
Adding Calculations
- Enable calculations for a feature. This option can typically be found in the feature settings panel within the iConfigure interface.
- Use the "Add Calculation" button to create a calculation rule.
- Define the calculation logic (e.g., numberInput x 20).
- Add conditions if the calculation is to be applied selectively.
Key Calculation Types
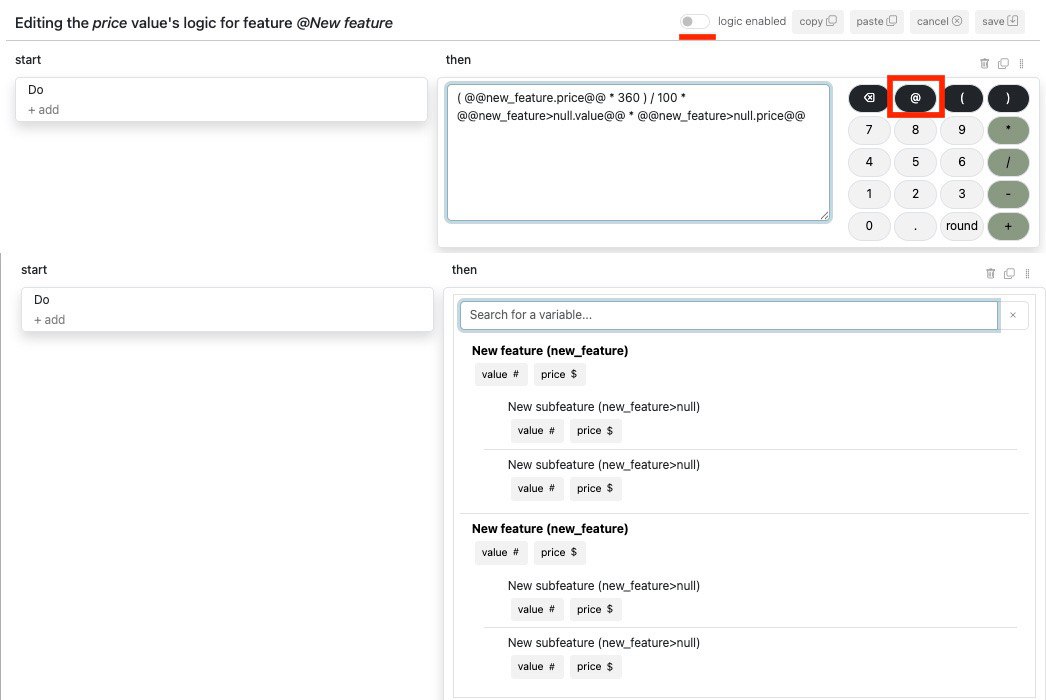
1. Dynamic Variables
Dynamic variables retrieve real-time values, such as prices or quantities, from features or subfeatures. For example, in a configurator for custom furniture, a dynamic variable like @@height.value@@ could be used to automatically adjust the price based on the user-specified height of a table. These variables update automatically based on user inputs or configurations. 
Feature-Level Variables:
- @@shapes.value@@: Retrieves the value (e.g., quantity) of the “Shapes” feature.
- @@shapes.price@@: Retrieves the price defined for the “Shapes” feature in the price field.
Subfeature-Level Variables:
- @@shapes>cylinder.value@@: Retrieves the value (quantity) of the “Cylinder” subfeature, even if it’s not selected.
- @@shapes>cylinder.price@@: Retrieves the price set for the “Cylinder” subfeature directly.
2. Static Values
Static values are hardcoded numbers that serve as constants in your calculations. While they are useful for fixed operations, they lack the flexibility of dynamic variables.
Example:
@@shapes.value@@ * 15
Multiplies the value of “Shapes” by the static number 15.
3. Rounding with ROUND
The ROUND(input, round_to) function adjusts values to the nearest increment specified by round_to.
Example: ROUND(4.2, 5)
- Input: 4.2
- Rounding to: The nearest multiple of 5
- Result: 5
Use Case:
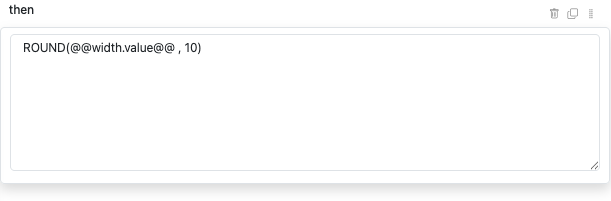
Rounding ensures standardization of dimensions, such as rounding widths or heights to the nearest 10 for manufacturing constraints:
ROUND(@@width.value@@, 10)
Practical Examples of Calculations
1. Simple Multiplications
Use Case: Calculating total costs or area-based pricing.
Example: @@shapes.value@@ * @@shapes.price@@
Multiplies the value (quantity) of “Shapes” by its price dynamically.
2. Subfeature Pricing
Use Case: Adding costs for optional subfeatures like “Cylinder.”
Example: @@shapes>cylinder.price@@ * 2
Multiplies the price of the “Cylinder” subfeature by 2.
3. Combining Features
Use Case: Adjusting pricing based on multiple features or dimensions.
Example: @@shapes.price@@ * @@height.value@@
Multiplies the price of “Shapes” by the value of the “Height” feature.
4. Conditional Pricing
Apply pricing logic only if a specific condition is met.
Example: If singleSelection = 1, apply numberInput x 20.
5. Quantity-Based Pricing
Calculate pricing based on quantities from multiple selections.
Example: Total price = (subFeatureQuantity1 + subFeatureQuantity2) x 100.
Best Practices for Future-Proof Calculations
Why Use Price Inputs as Variables?
Using dynamic price inputs ensures that updates can be applied globally without altering the underlying calculation logic.
Benefits:
- Flexibility: If the price changes, you only need to update the price field, not the calculation.
- Scalability: Reuse the same calculation logic across multiple features.
- Efficiency: Simplify updates and reduce errors.
Example:
Instead of hardcoding:
Total Price = @@shapes.value@@ * 15
Use dynamic pricing:
Total Price = @@shapes.value@@ * @@shapes.price@@
Impact:
If the price of “Shapes” changes from 15 to 20, you only update the price field in the feature, and the calculation adjusts automatically.
Combining Conditions and Calculations
Combining conditions with calculations allows developers to create a dynamic and responsive configurator.
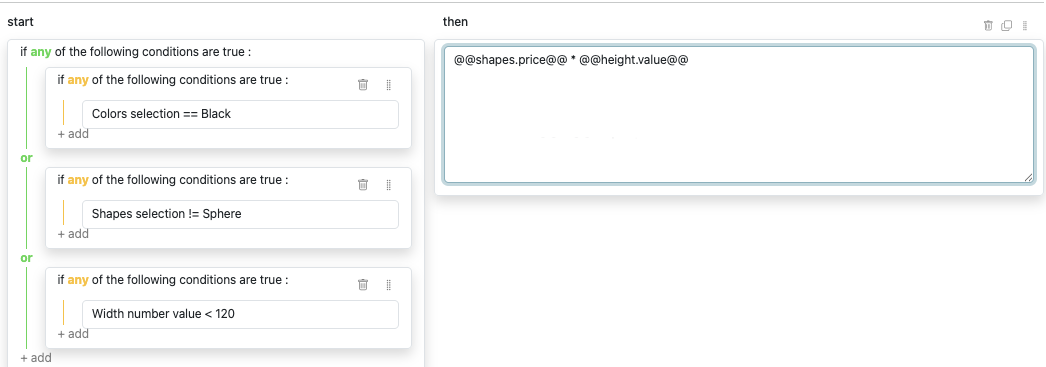
Example Scenario:
- If the “Color” is “Black” or the “Shape” is not “Sphere,” apply a 10% discount.
- Add a surcharge if the width is less than 120.
Calculation Logic:
 if Colors selection = “Black”
OR
 Shapes selection != “Sphere”
then
OR
 if @@width.value@@ < 120
thenCopy to clipboardErrorCopied
Total Price = @@width.value@@ * @@wshapes.price@@ * 0.9

Copy to clipboardErrorCopied
This layered logic ensures precise control over pricing and other dynamic adjustments. For instance, consider a scenario where a configurator adjusts pricing dynamically based on material choices and dimensions. If a user selects "premium wood" and specifies a width under 120 cm, the system can automatically apply a surcharge while simultaneously offering a discount for specific color selections. Such flexibility allows businesses to maintain profitability while offering tailored pricing models to customers.
Visual Examples
Dynamic Calculation Example
Formula: ROUND(@@width.value@@, 10)
Result: If the input width is 76, the output is rounded to the nearest multiple of 10 (80).Price Field Example
- Height Feature: Set a price of €0 in the price field.
- Shapes Feature: Set a price of €15 in the price field.
Subfeature Pricing
Example: @@shapes>cylinder.price@@ * 2
Dynamically retrieves the price for the “Cylinder” subfeature and multiplies it by 2.
Conclusion
By leveraging dynamic variables, rounding functions, and conditional logic, iConfigure’s calculation engine empowers you to create configurators that are flexible, scalable, and easy to maintain. For example, a company using iConfigure to design custom furniture could implement dynamic pricing models that adjust based on user inputs like material selection and dimensions, reducing manual effort while offering highly tailored customer experiences. This future-proof approach minimizes manual updates while providing users with a seamless, responsive experience.
Square Meter Pricing Calculation
When configuring products that involve dimensions, such as flooring, panels, or tabletops, calculating the price based on square meters is a standard requirement. If the width and height are entered in centimeters, you must divide them by 100 to convert them into meters before performing the calculation. This ensures accuracy and consistency with square meter pricing. 
Example Scenario
Let’s assume you are configuring a rectangular tabletop where the price is determined by its width and height in centimeters. The price per square meter is dynamic, meaning any updates to the price field will automatically apply to the calculation without requiring changes to the formula.
Calculation Formula
The formula for calculating the price is as follows:
(@@width.value@@ / 100) * (@@height.value@@ / 100) * @@price_per_sqm@@
- @@width.value@@: Retrieves the width of the tabletop in centimeters and divides it by 100 to convert it into meters.
- @@height.value@@: Retrieves the height of the tabletop in centimeters and divides it by 100 to convert it into meters.
- @@modelname.price@@: Retrieves the price per square meter, defined in the price field.
Example Calculation
 #### Inputs: - Width: 200 centimeters (`@@width.value@@ = 200`) - Height: 150 centimeters (`@@height.value@@ = 150`) - Price per square meter: €50 (`@@X.price@@ = 50`)
Formula:
(200 / 100) * (150 / 100) * 50
Result:
- Convert width to meters: 200 / 100 = 2 meters.
- Convert height to meters: 150 / 100 = 1.5 meters.
- Calculate the area in square meters: 2 * 1.5 = 3 square meters.
- Multiply the area by the price per square meter: 3 * 50 = €150.
The total price for a tabletop measuring 200 cm by 150 cm at €50 per square meter is €150.
Why Use Dynamic Variables?
Using dynamic variables, such as @@X.price@@, ensures scalability and maintainability. If the price per square meter changes, you only need to update the price field in the configuration. The calculation formula remains the same, saving time and reducing errors.
Advanced Adjustments: Adding Minimum Pricing
To account for manufacturing or handling costs, you can implement a minimum price condition in your calculation.
Formula with Minimum Price:
IF ((@@width.value@@ / 100) * (@@height.value@@ / 100) * @@X.price@@) < 100 THEN Total Price = 100 ELSE Total Price = (@@width.value@@ / 100) * (@@height.value@@ / 100) * @@price_per_sqm@@
Explanation:
- If the calculated price is less than €100, the minimum price of €100 is applied.
- Otherwise, the calculated price based on square meters is used.
Practical Use Cases
Flooring:
- Calculate the cost of wooden flooring based on dimensions in centimeters.
- Account for wastage by adding a small percentage to the calculated area.
Custom Panels:
- Configure wall panels with accurate pricing based on area.
- Apply premium pricing for specific materials or finishes using conditional logic.
Tabletops:
- Dynamically calculate the price for different materials such as wood or marble using price-per-square-meter variables.
3D Basics
Overview
3D integration allows for dynamic 3D visualization and interaction within the configurator. By utilizing puzzles and templates, developers can create highly interactive experiences.
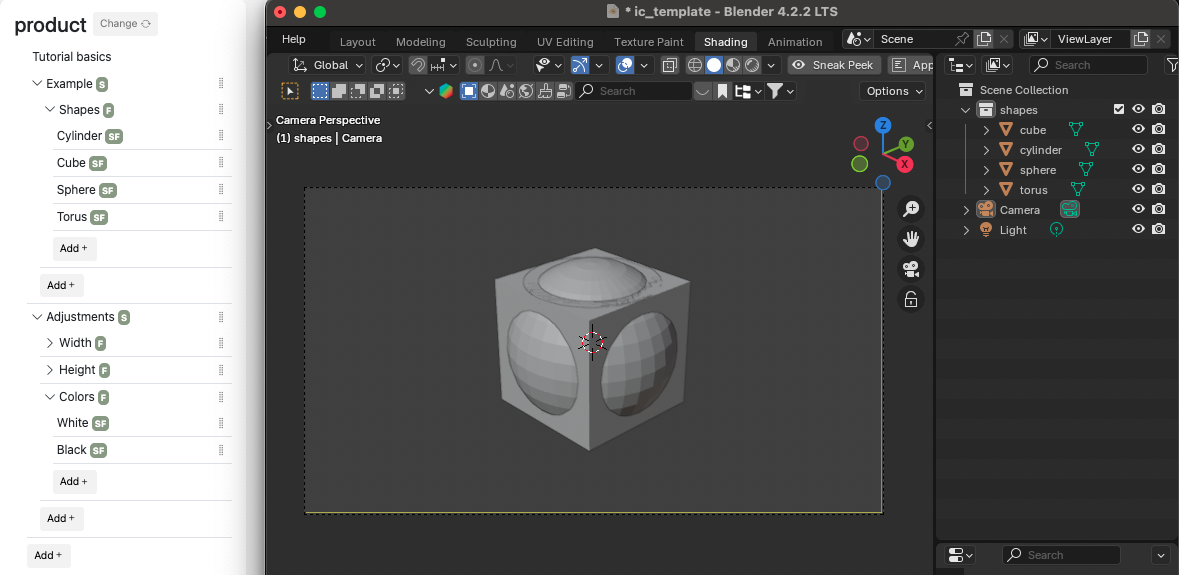
Setting Up 3D
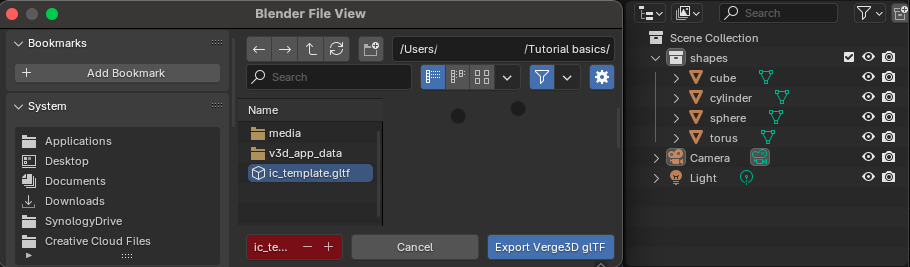
- Create a 3D model in Blender.
- Export the model using the 3D template provided by iConfigure.
- Add features and subfeatures in iConfigure (e.g., shapes, colors).
Dynamic Interactions
Use 3D puzzles to create dynamic interactions:

Configuration Updates: Trigger updates when features are changed.

Conditional Rendering: Show or hide objects based on feature values.

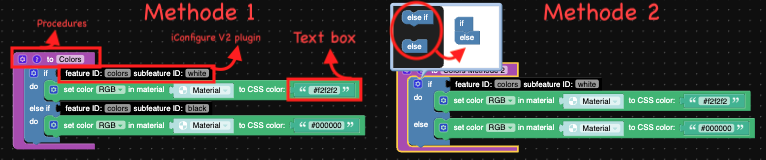
Material Changes: Dynamically update material colors (e.g., green or red based on selection).
Size Adjustments: Adjust the size of objects based on number inputs.
 For this methode we used a calculation of "Dividend by 100, minus 1" because of the morphtarget is 0 to 1 and our number inputs from iConfigure is 100 to 200 and our morph target scale is 1 to 2. with this calculations you have a 100cm model on the minimum input.
Practical Examples
- Shape Selection: Show a specific shape (e.g., cube or sphere) based on user selection.
- Color Changes: Update the material color dynamically.
- Size Inputs: Scale objects proportionally based on input values.
Advanced Features
- Get Active: Check if a feature is selected.
- Get Item by ID: Retrieve the selected item's ID programmatically.
- Scroll to Step: Navigate to specific steps in the configurator.
- Screenshot Generation: Capture screenshots for use in quotations.
Summary
With these advanced capabilities, iConfigure combined with 3D enables developers to create highly customizable and interactive 3D configurators. By leveraging conditions, calculations, and dynamic visualizations, you can provide an exceptional user experience tailored to complex product configurations.